DIY | Vintage Photo Pillows
I've been trying to figure out what to make some of our family members for Christmas. Last week I saw this pic in my December Country Living Magazine (my FAVOURITE magazine) and thought they looked pretty cute. I think photos on fabric can very easily look tacky or cheesy but being that these were old photos, black and white... I thought they were kind of classy.
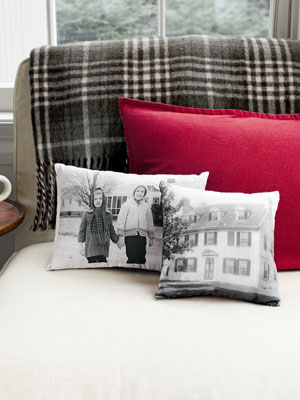
It inspired me to make this.
It's a photo I took of my two kids this summer while at Grandma and Grandpa's. They are standing on the corral fence trying to entice the horses and "Mee-Moo" the cow to come over. In the editing program I used the Timeless preset from One Willow Presets for the effect. Then I "washed out" the edges of the picture with a highlight priority.

Did you know that you don't need special fabric for the printer? Nope... you just need... Freezer Paper!

Can you find Freezer Paper in Canada? Not sure... I haven't. But I haven't looked all over Canada :) I grabbed mine at Walmart in Minot, ND.
Cut a piece of freezer paper the size of a 8.5 x 11 piece of computer paper. Then, just iron it on to the back of the fabric that you'd like to print the photo on. Cut the fabric to the size of the freezer paper after it's been ironed on.
UPDATE: I had a reader who commented and then found a solution that you can prepare your fabric with that will "set" the ink so that it's permanent and can be washed in the future. It's called Bubble Jet Set and you can read about how to use it here.
Thanks "Swankygirl109"!

I took my picture and put it on a word document so that I could size it to fill up the most of a regular sheet of paper. Put your freezer papered fabric into the printer so that it will print on just the fabric side (NOT the freezer paper).
Press print and viola!

I wanted to add a little depth to my pillow so I threw on an embroidery hoop and free-handed a little vine and leaf pattern on opposite corners in a dark gray that matched the ink.
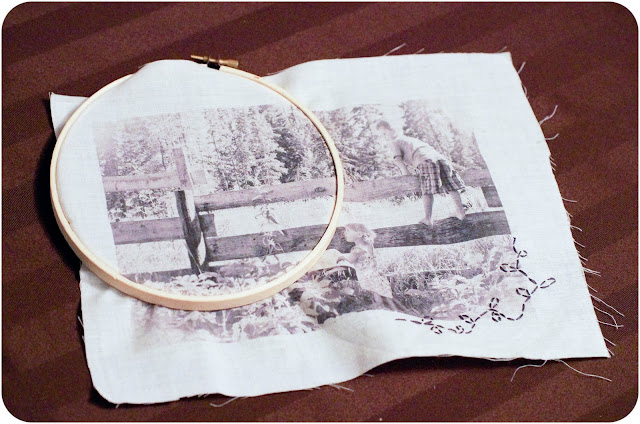
Once I finished the embroidery I gently ironed out the kinks made by the hoop.

Pick out a fabric for the backing and then pin the two fabrics right sides facing. Sew all the way around but leave an opening for turning and stuffing. When you've got it turned right side out and have it stuffed to perfection you can use a hidden stitch to close the opening.

And here you'll have a charming, personalized gift.
Another Update:
These pillows were so easy to make and so personal that I ended up making probably 8 for people for Christmas. Foolishly I didn't take pictures of them all but did snag this one of the one I made my dad after he opened it on Christmas morning. My dad is an all around outdoorsman and it was important to him to pass on these things to his grandchildren. He bought my son his first fishing rod and gave it to him this summer. He put a lead weight on the line and taught Kai to cast on the grass and then took us out on the boat and was the one to help him cast in the water - with a real hook. This picture was from Kai's second fishing outing and where he caught his first fish so it was quite the event.
If you don't want to be restricted to an 8.5 x 11 pillow you can make "photo patches". Check out the "Love Notes" pillow I made for Valentine's Day!

For real: my jaw was hanging open. I am awestruck!
ReplyDeleteThe picture is a treasure but this trick you've shared is amazingly cool! Wow. Seriously. Thank you so much!
So cute!!! I have found freezer paper in Canada- our Sobey's Cash and Carry has it, but only the brown stuff and I had to buy a HUGE roll. It should still work though. I might have to make this for the grandmas for Christmas.
ReplyDeleteI had the same thought when I saw them in Country Living "wow those are actually really cool instead of what you normally find with pics on fabric." My mom actually has some really neat black and white pics from when she was younger that would be fun. But I thought it would be expensive to execute...thank you so much for the how to. Your pillow turned out awesome!
ReplyDeleteThanks ladies! They're so simple I think they could get addicting to make! And Jen... good to know freezer paper does exist in Canada!
ReplyDeleteWow! That is so cool! Thanks for sharing.
ReplyDeleteWhat a GREAT idea! I've never seen this done before! Super cool and a perfect gift for mother in laws and mothers indeed! :D
ReplyDeleteHey so I guess you know someone that I know. Aimee Sartison suggest I check out your blog as she said I'd enjoy it and she was right! :)
I'll be following your regularly.
www.lifelikehoney.com
Very cool pillows. If you're printing directly onto the fabric, what is the purpose of the freezer paper? Just to keep the fabric stiff in the printer?
ReplyDeleteErica - yes, the freezer paper is just to keep it stiff so it will go through the printer properly. Works great. I just finished 5 more pillows tonight :)
ReplyDeleteTeaka - thanks for coming by! Aimee is such a dear friend and I miss her like crazy! She's a good person to have in common :)
it never says to remove freezer paper - does it stay attached when pillow is finished?
DeleteNo, thanks for clarifying. You peel it off as soon as it's come out of the printer.
DeleteDo you have to do anything special to set the ink? I'm just afraid if it accidentally gets wet it would ruin the pillow. Very very cute idea! I may try this for my Grandma. :)Also, this may seem silly but is wax paper the same thing as freezer paper?
ReplyDeleteHi.. I didn't do anything to set the ink. I wouldn't wash them as I'm sure they'd be ruined. As for accidentally getting wet... one of my pillows was sitting on a pack of open wipes before I stuffed it and I thought all the ink would run as there was a large wet spot but it didn't (thankfully). I think the difference between wax paper and freezer paper is that wax is "waxed" on both sides and freezer paper only on one. If you tried to iron wax paper onto fabric you'd have a very sticky waxy iron so you do actually need to track down freezer paper. I've heard from others that you can also usually get it from a local butcher or meat shop as they commonly use it. Hope that helps!
ReplyDeleteOk. That makes sense. Thank you!
ReplyDeleteI searched around the internet and found that this site had a way to set the ink (with bubble jet set and bubble jet rinse) so the fabric could be washed. I thought it might be helpful because I love the pillow idea but don't want to worry about my gift fading or washing away! :) Thanks for your tutorial and help!
ReplyDeletehttp://quiltbug.com/Articles/bubble-jet-set.htm
This article moved. It's now at https://phoebemoon.com/tutorials/bubble-jet-set.htm
DeleteVery cool thank you! It would definitely be a must if making a quilt. I had no idea such a thing existed! I'll add the link you posted in an update to this post so others can see how to set their own pics. Thanks!
ReplyDeleteAdorable!! What a treasure for those lucky Grandmas!
ReplyDeleteThis is perfect for Grandma gifts...I will definitely be trying it!
ReplyDeleteI'm a flooded out Minot resident and just stumbled upon your blog via Pinterest--small world! Our Walmart here is ca-razy these days, isn't it?!
Love it. a friend is getting married and want pictures on fabric to make a quilt later. thank you so much. off to the store for freezer paper. :)
ReplyDeleteSo, does it have to be an inkjet printer or will a laser printer work too?
ReplyDeleteI've never used a home laser printer but I just "googled" it and some mentioned that because it uses heat in the process the fabric may be stiffer. Maybe you could try a small test picture? If you do, please let us know if it works!
ReplyDeleteI read a blog where you can use vinegar to set the ink after you print it. Just soak the fabric in a vinegar bath for 5-10 min (I believe) and then wash. MUCH cheaper than Bubble Jet Set!
ReplyDeleteLOVE it!!! Does it matter what type of fabric you use? Also, do you iron the "waxy" side of the wax paper to the fabric?? THANK YOU FOR THE WONDERFUL IDEA!!
ReplyDeleteHi! I don't think the type of fabric matters at all as long as you can see what you're print on it. Wax paper won't work as both sides are waxy so you definitely need to use freezer paper where only one side is waxy. Iron the waxy side to the fabric (otherwise it won't stick and you'll have wax all over your iron :) Then when you print make sure you're printing directly onto the fabric and NOT the freezer paper.
Deletewonder if you could lay a piece of regular paper on top of the waxed paper before you iron - then wax wouldn't get on your iron?
DeleteDefinitely worth a try! It's really just to keep the fabric stiff while you run it through the printer so it could totally work.
DeleteCan you color print too?
ReplyDeleteDefinitely!
ReplyDeleteHi, just reading the questions about wax paper vs. freezer paper. Freezer paper is actually plasticky on one side, not wax. Wax paper is going to prevent the ink from sticking to the fabric- that's what you use when doing batik to block out where the fabric will hold dye. Hope this bit of info helps.
ReplyDeleteWhat a great tutorial! Thank you! I just wanted to let you know that I live in Winnipeg and found a big roll of frezzer paper at Safeway!
ReplyDeleteSweet! I've heard many people finding it in bigger cities, not sure why I couldn't find it in all of Estevan but to be honest it happens all the time!
DeleteJust getting to making these pillows. I have a lexmark interpret S405, nothing fancy. I've tried this 4 or 5 times and it always jams. I only get half of a picture. The freezer paper isn't really sticking that well. Anybody have any suggestions? What type of fabric are you using?
ReplyDeleteI was using a very light cotton muslin. What fabric are you using? I'd also make sure you really iron it well to make sure the freezer paper sticks, emphasizing the edges. The printer I used wasn't super fancy either. Do you have a setting for cardstock? That might help your printer deal with the added thickness.
DeleteDefinitely use the cardstock setting if you have it!
DeleteWJ, it helps if you starch the fabric before ironing it onto the freezer paper. I just made a printed quilt label using this method and it worked fine. Also ironing the print after removing the freezer paper also helps set the ink.
ReplyDeleteGreat idea.
DeleteI did it!! It took 2 times, but its beautiful. I did use the cardstock option on my printer (under preferences). The second time I made sure to really iron the freezer paper on the edges and then I took out the other paper and helped guide it in, I sort of pushed it just a tiny bit, because the first time it only printed 1/2 the pic.
ReplyDeleteI used a muslin, and I put the iron on really hot, then cut then ironed again.
Awesome! So glad it worked for you. Feel free to leave a link to any pics we'd love to see your creation!
DeleteI've read this step over and over but not sure I understand.. :/
ReplyDelete"I took my picture and put it on a word document so that I could size it to fill up the most of a regular sheet of paper. [This part I understand. :)] Put your freezer papered fabric into the printer so that it will print on just the fabric side (NOT the freezer paper).
Press print and viola!"
You put fabric through the printer? I have visions of it getting caught up inside and hearing the rollers scream for release. (or is that just my fatalistic daydreaming?) Please help!
Ha ha! Yes you put your fabric through the printer. The freezer paper is just used to stiffen the fabric and help it "act" like paper in the printer. I've seen lots of people pin this project with a caption that they use freezer paper to transfer the print but that's not it at all - the fabric must go through the printer. I made 8 pillows and didn't have one glitch.
DeleteOne reader had the fabric get jammed but I think once she set her printer to cardstock that helped. Other readers have suggested starching your fabric as well and I've pointed out that it really helps to make sure you iron the edges really well.
Good luck and if you try it out let us know. Feel free to ask any more questions if you've got any :)
I am having trouble printing the photo on the fabric-it continues to wrinkle. does anyone have any suggestions?
ReplyDeleteHow thick is your fabric? And have you been able to set your printer settings to a heavier paper like cardstock? Or maybe your fabric might be too thin making it wrinkle. What would happen if you did 2 layers of freezer paper? Just some thoughts! Anyone else have ideas?
Deletevery interesting. in France, I have not found this paper. , I proceed as follows:
ReplyDeleteI take a sheet of plain paper
I put on the glue NO-PERMANENT spray
I put my tissue above
I cut the excess fabric
I print large paper option
I took off my tissue paper
I pass
I do not wash!
Good idea! And it worked well for you?
Deleteoh yes !
ReplyDeletehttp://rebecca-gatheryeroses.blogspot.fr/2010/01/how-to-make-your-own-faux-bubble.html
ReplyDeletei don't try .....
here , you can wash!
ReplyDeleteit's the différence !
and isn't expensive !!!
I found on another site how to set your ink: when it feels dry , just place a piece of parchment paper over it and iron with a hot iron setting and this will set the colors. (I tried it and it seems to work. I could tell the difference.)
ReplyDeleteThis might be a stupid question, but how did you sew the fabric together? Did you use a sewing machine? I'm not very crafty, but I just love this pillow idea!
ReplyDeleteHi! Yes I sewed it together on a sewing machine. Place the "right" sides (sides you want showing) together and sew all the way around except for a 3 inch spot in the middle of the bottom. Then flip inside out so that your seams are hidden and you can see your picture. Stuff and then hand sew it together. You could hand sew the whole pillow though, they're not very large. Have fun!
DeleteThis comment has been removed by the author.
ReplyDeleteHi,I just love the idea,I am getting started on making some for my mom and other family members. And since I want my pillows to be bigger so that they can be used as normal sleeping pillows,I figured I will print a A 4 page and then sow my printed fabric on a larger piece if fabric with a border around.something soft, so it's still comfy to sleep on. Thought I'd share fir others that had the same thought of making a bigger pillow
ReplyDeleteIt totally works! I used several pictures and quotes to make my "Love Note Pillows". I like the patchwork look to it :)
DeleteSo.. I tried this and failed :( I did everything correct BUT my printer kept getting jammed (I'm guessing because of the thickness), so I tried to just bring on the wax and iron that on the fabric hoping that it would transfer.. That was a fail too :(
ReplyDeleteAny suggestions on what I can do to make this work? I had these all planned out as my Christmas gifts and really need them to work haha. Thanks in advance!
Bummer :( Can you tell me what type of fabric you were using? I've always used a really thin muslin and have never had any issues with jamming. Others on the comment feed have suggested taping the edge feeding into the printer with masking tape, you could try that. And does your printer have a cardstock option or perhaps a photo paper option? Either might make it slow down a bit. Hope it works for you soon! I guess you could always buy actual iron on photo transfer paper but that kind of takes the fun out of it ;(
DeleteAlso, I do not have a cardstock option :/
ReplyDeleteJust saw this... what about a photo paper option?
DeleteThis is so cool! I never would have thought to try that. Love it!! I had to tweet it too :) @txblond
ReplyDeletehttp://www.noordinaryhomestead.com
Awesome. Thanks!
DeleteOk I NEED to try this I have a laser printer... Anyone tried it? Thanks
ReplyDeletePeople have used it on laser printers with success. Give it a go!
Deleteok I did it on my laser printer!!! its beautiful!!
ReplyDeletehttp://www.facebook.com/photo.php?fbid=10151107899442035&set=a.10150096274452035.276368.731817034&type=1&theater
Just checked it out. It looks great!
DeleteTo get the printer to accept the paper/fabric, tape the edge that you feed into the printer, with masking tape. 1/8th inch or less being on the fabric side, and the remaining to the paper side.
ReplyDeleteGreat idea!
DeleteI did it! It didn't jam, I used the card stock setting. Then I sprayed it with scotch guard, and when we washed it later the ink stayed on perfectly! Thank you so much.
ReplyDelete-totally addicted.
I LOVE the scotch guard idea. I'm definitely going to have to try that and update my post! Great work! Feel free to leave a link and show off your work!
DeleteThis comment has been removed by the author.
ReplyDeleteHola, gracias por compartir esta idea es muy buena. Pueden imprimir muchas fotos en blanco y negro. Luego recortas en tela estampada o unicolor y vas alternando los cuadros, así podrás confeccionar una colcha única con tus recuerdos familiares.
ReplyDeleteYou can set your color with a vinegar wash too!
ReplyDeleteI like the Epsons which use Claria best for my glossy/semi-gloss photos, but I have had more permanent results on fabric(even washable) with the Epson printers which use their DuraBrite inks. Many of these are very inexpensive, come with full cartridges, and are very easy to use - and photos come out awesome.
ReplyDeleteI have tried this 3 different ways and there are always lines down my fabric where the printer is printing each section. Does anyone have a way to resolve this? We tried cleaning the cartridges and the printing spools. Is it a fabric issue?
ReplyDeleteHmm, I wonder if it might be the fabric. Have you tried it again with another fabric?
DeleteThis comment has been removed by the author.
ReplyDeleteI found mine in Walmart in the states but I've had readers comment that they found it in Sobey's in Canada.
Deletethis is so cool, and a brilliant use for the MASSIVE roll of freezer paper that has been sat in my stash since I bought it (I used a teeny amount for a quilted badge). My cousin is leaving home to go to university soon and this would be a lovely going away present with the rest of the family on a cushion or pillow he'll have a reminder of home that is comfortable too!!!
ReplyDeleteGreat idea! They are fabulous keepsakes!
DeleteThis comment has been removed by a blog administrator.
ReplyDeleteDo you remove the paper once you print? I assume you are ironing the waxy side the fabric. It looks like you used a linen fabric. Is there one type of fabric over another that you found prints best?
ReplyDeleteYes, I remove the paper once it's printed. I haven't tried too many fabrics but definitely think that a thinner fabric has the best chance of going through the printer without jamming.
DeleteYes, these are out on our covered back porch. I just taped mine as shown in the tutorial and haven't had any issues with moisture and they've been up now for six or seven months.
ReplyDeletelarge photo prints
This is such a great idea! I get my photo printing done in Calgary and absolutely love the different services they offer!!
ReplyDeleteDo you think it would help to use iron-on interfacing (the type dressmakers use to stiffen collars etc.) instead of freezer paper?........just a thought....might be worth trying.
ReplyDeleteI haven't worked too much with interfacing - are there some that you can peel off after? I'm sure that even if you couldn't you could use a thin enough one that the fabric would still have some flex - maybe like embroiderers use?
DeleteThis is the coolest, hope I can get the Freezer paper here. If you go to my blog you can see how I do add my paintings to a candel. Thanks for the turtoral :-)
ReplyDeleteGreat idea, I've seen some cat pictured pillows on Etsy, but this is a way better idea (with some work).
ReplyDeleteDo you have to use an ink-jet printer?
ReplyDeleteI bought my freezer paper at Metro grocery store in Ontario. I'm looking forward to trying this method! Thank you :)
ReplyDeleteThis comment has been removed by the author.
ReplyDeleteFYI: waxed paper is used to clean fusible off irons. It does not make the iron sticky at all. I have used Bubble Jet Set and after rinsing, the pictures looked washed out. I prefer to use Printed Treasures ink jet pretreated sheets. Look a little washed out but not as much.
ReplyDeleteI do not rinse after printing, using Bubble Jet Set. When the print has dried a bit, I iron to set. I've seen no color loss. It also helps to adjust your print to "vivid" or a setting (on ink jet only) which will add more ink than usual. I've just done 6 photos of old signs onto white muslin for the center of crazy quilting blocks.
ReplyDeleteThis is so wonderful, thank you for sharing. I cannot wait to try making a photo pillow.
ReplyDeleteI would love to make these for my sisters-in-law for Christmas. I am not a photographer though and I am wondering if I need the photography software you mentioned or can I simply scan the photo into my computer and go from there? Did you use the one willow just for blurring the edges, etc. or is it necessary?
ReplyDeleteSome friends of mine and I are having a Craft Night in a couple of weeks. do you think this would be a good beginners project?
ReplyDeleteCould I just use the copy option instead of print to get the photo onto the fabric?
ReplyDeleteThis comment has been removed by the author.
ReplyDeleteWhat fabric did u use here???
ReplyDeleteAnd which fabrics work best?? Thank u:)
I see some very old comments. Are people still using this method with success? or there is another method out there?
ReplyDeleteYes I have used Bubble jet set it works fine , wash size out of new fabrics first , cut into A4size sheets of fabric of A3 if your printer can Print that size , iron fabric onto Freezer paper , make sure leading edge and sides are not overhanging edges and trim any threads sticking out , set printer to best photo quality and print setting for high quality , I tweaked the ink up a bit so plenty of color. Print your picture onto fabric side of sheet. Iron it to set ink then wash , to rinse out excess ink ( that's why I use a bit more ink in printing as some washes out , one thing I found , DO Not Use Fabric Softener I found it made ink run and spoilt one of my squares if got splashed consentrated on fabric. I made two quilts using this method one for my Grand Daughter with photos of horses and her riding on it the second was a memory quilt of my mother from a little girl of 6 her siblings and her marriage and me ,my sister and Brother as children and our marriages , down to her Great Grand children , all colored black and white old photos repaired with Photoshop before printing on fabric .
ReplyDeleteThere's also fabric you can buy already prepared for the printer, although this way may be cheaper, or not. :)
ReplyDeleteI love this!!! Thanks for all the comments...you all answered the questions I had! Think I'll go try to make a pillow right now!
ReplyDeleteJourney pillows can reduce fretboard and back pain and may make your trip far more relaxed and pleasant. We are able to assist you to pick the best traveling cushion!travel pillows for airplanes
ReplyDeleteVery interesting article !! thanks for posting.. For Valentine Gifts please visit http://www.giftcart.com/buy-online-gifts-for-valentine-day.html
ReplyDeleteSo after printing the picture, do you take the freezer paper off?
ReplyDeleteLove this idea!very interesting method of transferring. Ive seen tutorials about this, and they seemed more complicated than this. I think I have found my next project!
ReplyDeleteGreat post is this!Brooklyn Bedding Coupon
ReplyDeleteThe next time I read a blog, I hope that it doesn’t disappoint me as much as this one. I mean, I know it was my choice to read, but I actually thought youd have something interesting to say. All I hear is a bunch of whining about something that you could fix if you weren’t too busy looking for attention.
ReplyDeleteCustom Yoga pants
Hello Admin, i found your blog to be really informative your blog raised many modern points of fashion designing but i have also publish a website .
ReplyDeleteembroidery digitizing service
embroidery digitizing company
I came to your site and have analyzed your post. There are excellent details you posted here.
ReplyDeletedigitizing service
custom embroidery digitizing
logo digitizing embroidery service
Putting the cardboard inside the pillowcase gives you something to write on and keeps the ink from bleeding through silk pillowcase for hair Hoover improved the old vacuum cleaners and made them look more like the ones we see around today
ReplyDeleteWe have been doing Website Designing for past 3 years and we have designed a lot of websites and delivered great masterpieces to the individuals or firms.
ReplyDeleteWebsite Designing & Development Company in Delhi
best website design
responsive web design
SEO Company in Delhi
SEO Services India
Website Designing Company in Dwarka
SEO Services
website designing in Delhi
information from you.
ReplyDeleteAstrozCafe is recognized as the premier astrology consulting service provider in India. We are a mobile marketplace for astrology and other modalities of predictive sciences. You can talk instantly to our expert team anytime and from anywhere. For best Astrologers visit at https://astrozcafe.com/.
ASTROZCAFE |
Thanks for sharing your piece of knowledge. The users available on the site will get best knowledge or information from you. Puspack is thanking you from the deep of his heart. Try Cheap International and domestic Air Tickets and Cheap International and domestic Air Tickets | Billetes de avión baratos nacionales e internacionales | Goedkope internationale en binnenlandse vliegtickets | Günstige internationale und nationale Flugtickets, Cheap International and domestic Air Tickets.
We provide value for money web designing and digital marketing services anywhere in India. For more information about our website related services.
ReplyDeletewebsite Development Company
web Developmet Services
web Designing Company in Delhi
Web Designing and Development Company in Delhi
Website Design and Development Company
SEO Services in Delhi
Search Engine Optimization Services in Delhi
Nice Pillow Cover Printing blog and i will share to my friends. Also i suggest Textile Printing Services.
ReplyDeleteHow do I join your blog so that I get it sent to my email address please?
ReplyDeleteNice Pillow Cover Printing blog and i will share to my friends. Also i suggest
ReplyDeleteDigital Textile Printing.
If you want to know how to print your cushion cover with own photo or name. Read here: https://bit.ly/2lSK5s5
ReplyDeleteNice Pillow Cover Printing blog and i will share to my friends. Also i suggest Textile Printing Faridabad.
ReplyDeletewebsite designing company in Delhi
ReplyDeleteseo company in delhi
Buy green coffee beans online
ReplyDeletegreen coffee beans for weight loss
Natural weight loss solutions
Organic Green Coffee Beans Online
Nice Digital Fabric Printers blog and i will share to my friends. Also i suggest Pillow Cover Printing.
ReplyDeleteWe provide a complete list of high domain authority Sites For Classifieds, Article, Blog, Business Listings, Social Bookmarking, Press Release, Video, PPT , Image sharing.
ReplyDeleteClassifieds Submission Sites in India
Classifieds Submission Sites in USA
Classifieds Submission Sites in UK
free classified websites without registration
business listing sites in india
instant approval directory submission sites list
image submission site
social bookmarking sites list
ppt submission site list
profile creation sites
wonderful post i really like it gift to Pakistan
ReplyDeleteNice blog for photo print information.
ReplyDeleteThanks for share
v-stilshop
Keutamaan DoaNino Nurmadi, S.KomYaasin Cara Shalat Nabi Muhammad Kencing Malaikat Nino Nurmadi, S.Kom Nino Nurmadi, S.Kom KhalifahTayamum
ReplyDeleteWow! That is so cool! Thanks for sharing.
ReplyDeletegraduation gifts for best friend
anniversary gifts by year
best linen pillowcases
ok cảm ơn bạn đã chia sẻ
ReplyDeletehttps://ngoctuyenpc.com/man-hinh-may-tinh-24-inch
https://ngoctuyenpc.com/mua-ban-may-tinh-cu-ha-noi
https://ngoctuyenpc.com/mua-ban-may-tinh-laptop-linh-kien-may-tinh-cu-gia-cao-tai-ha-noi
https://ngoctuyenpc.com/cay-may-tinh-cu
Những điều bạn chia sẻ quá hay
ReplyDeletehttps://bonngamchan.vn/may-massage-chan-hang-nhat-co-tot-nhu-loi-don/
https://bonngamchan.vn/
https://bonngamchan.vn/danh-muc/bon-ngam-chan/
https://bonngamchan.vn/may-ngam-chan/
Những gì anh chia sẻ tôi thích lắm
ReplyDeleteDịch vụ vận chuyển chó mèo cảnh Sài Gòn Hà Nội
Chuyên dịch vụ phối giống chó Corgi tại Hà Nội
Phối chó Bull Pháp
Wonderful blog post!
ReplyDeleteBuy Instagram Followers India , Buy Worldwide Instagram followers at cheap price
Thanks for sharing nice post.
ReplyDeletebest digital marketing institutes in Bangalore
best orthopedic hospital in Bangalore
best 2d animation company in Bangalore
best 3d animation companies in Bangalore
dofollow instant approval blog commenting sites list
Best meta tag generator tool for blogger
the amp - best seo friendly amp blogger template
ok anh máy xông tinh dầu phun sương bottle cap
ReplyDeletemay xong phong ngu
may xong huong
may phun suong nao tot
Such a great post. Buy Tiktok followers India Buy Worldwide Tiktok followers at cheap price
ReplyDeleteSuch a wonderful blog post! They are nice article shared. I likes your post. Looking for real active followers for instagram profile, then i would recommend to Buy instagram followers India
ReplyDeleteAnson Sports is the established brand in the field of gym equipment manufactureres in india.We provide wide range of gym equipments liks treadmill, dumbell,weights,gym clothing and much more.To know more about us visit at.
ReplyDeleteBuy dumbbell online in india
Buy exercise bikes in india
Gym equipments manufacturers in delhi
Gym equipments manufacturers in mumbai
good
ReplyDeletemáy tính hà nội
màn hình máy tính
mua máy tính cũ
màn hình máy tính cũ
Many of us bear muscle pain each day. Buy Tramadol Online, and find immediate relief to your daily muscle pain. Relax your muscles now.
ReplyDeleteMany of us bear muscle pain each day. Buy Tramadol Online, and find immediate relief to your daily muscle pain. Relax your muscles now.
ReplyDeleteFLEX PRINTING SERVICES best available in jainand Digital Point very very lowest prices.
ReplyDeleteNice information.
ReplyDeleteMysmartodisha
Hindi Me jankari
Odia Dictionary
Odisha Govt Jobs
Điều anh chia sẻ thực sự thú vị lắm
ReplyDeletemáy xông tinh dầu bằng điện
máy khuếch tán tinh dầu silent night
máy xông tinh dầu đuổi muỗi
máy khuếch tán tinh dầu hà nội
lovely post!!
ReplyDeleteMust visit!!!
Do not let your Pillow give a pain in your neck!
Thank you so much for this beautiful blog. I enjoyed each and every part of it. It includes a huge amount of knowledge. If you're looking for Raster to Vector services then must visit Digit-it.com.
ReplyDeleteGreat post!!
ReplyDeleteMust have a look atTake care of what you sleep on
I genuinely gained some remarkable experiences in assessing your article.
ReplyDeleteSend Valentines day gifts to Pakistan
I found this much informative, Very useful for me, as it contains lot of information. thanks
ReplyDeleteWater Softener Services in Dwarka
Water Softener Services in Delhi
Yes i am totally agreed with article and i want to say that this article is very nice and very informative article.I will make sure to be reading your blog more. You made a good point but I can't help but wonder, what about the other side? !!!!!!THANKS!!!!!!
ReplyDeletesilk pillowcase
i want to say that this article is very nice and very informative article.
ReplyDeletebathroom rugs
FLEX PRINITING SERVICES available in jainand Digital Point at reasonable prices. Print here and save huge amount of money.
ReplyDeleteYes i am totally agreed with article and i want to say that this article is very nice and very informative article.
ReplyDeletehttps://impactdigitizing.com/embroidery-digitizing/
MyBlogger Club
ReplyDeleteGuest Posting Site
Best Guest Blogging Site
Guest Blogger
Guest Blogging Site
Great blog. Thanks for share this post. It may helpful for all newbie bloggers, i really appreciate
ReplyDeleteWater Softener Services in Gurgaon
Water Softener Services in Dwarka
Very Nice Blog and Thanks for share this post. Top, Tuition Online, Best Advanced Quizzes Maths Classes Institute Courses Center in Chandigarh,
ReplyDeleteNice Article, Thanks For Sharing This Informative Article
ReplyDeleteFashion Designing Institute in Hamirpur
Really its very useful information that you have shared and looks great post. Waiting for more posts from you.
ReplyDeleteSuch an informative article for all the embroidery related people this type of blogs surely increase ability on embroidery work. We're digitizing services provider for embroidery you can avail our service as well. by logo digitizing logo design
ReplyDeleteGreat Post!
ReplyDeleteVery informative post. Covered almost everything. Please Keep sharing such a useful content for us.
Roma Puf is a zero compromise brand bringing a new generation of products with Strong testing and proper quality control, checked at multiple levels for the bestest of experience and no less. If you want to buy Mattress , Pillows, Comforters, Protectors, Bed Linens then call us on +91-7303485486 or visit our website: romapuf.com
Thank You
Nice Blog !
ReplyDeleteOur team at QuickBooks Phone Number actively listens to your QuickBooks request on an unprecedented scale.
Nice Blog !
ReplyDeleteOur team at QuickBooks Phone Number ensures a smoother experience and eliminates all your bugs quickly in times of crisis and anxiety.
Great article. It is very helpful blog for everyone.Thank you for sharing with us. If you face any problem using QuickBooks, click here QuickBooks phone number for technical support.
ReplyDeleteGreat Blog! Increasing knowledge of many. If anyone want some great embroidered patches and logo services give a visit to https://www.digitpunch.com/
ReplyDeleteHi there,
ReplyDeleteThank you so much for the post you do and also I like your post, Are you looking for
CAVAPOO PUPPIES Ashley, CAVAPOO PUPPIES Billy , CAVAPOO PUPPIES Jack , CAVAPOO PUPPIES Jackie, MALTIPOO PUPPIES Lucy , MALTIPOO PUPPIES Meli with the well price and our services are very fast. Click here for
Email: info@cavapooandmaltipoopuppieshome.com
Great article. It is very helpful blog for everyone Need Complete Solution for Advertisement Management Software
ReplyDeleteThank you so much for the post Need Complete Solution for Advertisement Management Software
ReplyDeleteThis is a great post. We’re new to blogging as our primary source of income has always been freelance software engineering. I will be taking a look directory submission sites list at some of these recommendations. Thanks for sharing!
ReplyDeleteGreat post. there was much important information in it. I have seen your post is! your post I follow.
ReplyDeletethank you
web development trends
Wonderful, this is more than I expected. Thanks, this is exactly what I was looking for. This is so great I don’t need to make any revisions to it at all
ReplyDeletefinally i found best reading blog site in google, thanks for sharing this type of useful articles to read, keep it up and all the best. seo services in dubai
ReplyDeleteThis is very interesting, You’re a very skilled blogger. I have joined your feed and look forward to seeking more of your great post. Also, I have shared your web site in my social networks!
ReplyDeleteProduct Submission Sites
Hey everyone.
ReplyDeleteWe are giving you the big best offer to buy logo design for your business with 75% off I expect You will be happy with us.Logo Designer
Hey everyone.
ReplyDeleteWe are giving you the big best offer to buy logo design for your business with 80% off I expect You will be happy with us.Logo Designers
ReplyDeleteThank you so much for such a wonderful blog. I’m really thankful to you for this informative
Product Submission Sites
I think this is one of the great posts on this topic. This post is really great, very efficiently written information. Keep up the good work and keep us sharing these kinds of informative posts with us. I will also try to check out your other posts.
ReplyDeleteclassified sites
This was a great post. what you said is really helpful to me and it was really interesting as well. Keep up with your good work. Buy Instagram Followers India
ReplyDeleteIn my opinion, it’s highly required to add a few words about one more trend. Users’ behavior has changed drastically due to the COVID-19 pandemic, and it seems they will stay changed even when the pandemic is finished. Once the share of e-commerce websites is quite high, it’ll be acceptable here to detail the trend which is common for e-commerce only websites
ReplyDeleteaffordable seo for small business
thanks you very much updated information.I believe that people and not solely technology is imperative in instilling forward-thinking, sustainable business development.
ReplyDeleteaffordable seo for small business
Wonderful, this is more than I expected. Thanks, this is exactly what I was looking for. This is so great I don’t need to make any revisions to it at all
ReplyDeleteEconomic SEO services
Your information is great. It’s beneficial for this blog. Also, great with all of the valuable information you have. Keep up the excellent work you are doing well. thank you
ReplyDeletehttps://lowcostseo83475854.wordpress.com/
WOW…
ReplyDeleteI love this post. The information in this article is useful for me. After reading this article, I think I have some ideas for myself.
Thanks for sharing!
https://lowcostseoservices325838686.wordpress.com/
This is very interesting, You’re a very skilled blogger. I have joined your feed and look forward to seeking more of your great post. Also, I have shared your web site in my social networks!
ReplyDeleteSEO services
WOW…
ReplyDeleteI love this post. The information in this article is useful for me. After reading this article, I think I have some ideas for myself.https://seoservice590165048.wordpress.com/
Thanks for sharing!
Your information is great. It’s beneficial for this blog. https://seoservice590165048.wordpress.com/
ReplyDeleteAlso, great with all of the valuable information you have. Keep up the excellent work you are doing well.
thank you
I really enjoyed your blog Thanks for sharing such an informative post
ReplyDeleteSEO on Instagram
Your post is very informative. profile creation sites
ReplyDeleteWe’re new to blogging as our primary source of income has always been freelance software engineering. Thanks for sharing!
Wonderful, this is more than I expected. Thanks, this is exactly what I was looking for. This is so great I don’t need to make any revisions to it at all
ReplyDeleteProfile Creation
Thanks for provide great informatic and looking beautiful blog, really nice required information & the things i never imagined and i would request, wright more blog and blog post like that for us. Thanks you once agian
ReplyDeletedigital marketing
Thanks for the genuine article good work keep it up solarmovie
ReplyDeleteGOOD ONE ......
ReplyDeleteThis is a great post. We’re new to blogging as our primary source of income has always been freelance software engineering. I will be taking a look post free classified ads without registration in usa at some of these recommendations. Thanks for sharing!
ReplyDeleteIf your fabric is fairly thin then help online embroidery digitizing, you can transfer the designs directly onto the fabric using a light source such as a light box or window, marking the lines with a chalk-based marking pencil or water-soluble transfer pen or pencil. In a pinch, a finely sharpened standard pencil will also work.
ReplyDeleteIf your fabric is fairly thin then help online embroidery digitizing, you can transfer the designs directly onto the fabric using a light source such as a light box or window, marking the lines with a chalk-based marking pencil or water-soluble transfer pen or pencil. In a pinch, a finely sharpened standard pencil will also work.
ReplyDeleteThanks for sharing such useful information with us. I hope you will share some more info about your blog. Please keep sharing. We will also provide QuickBooks Customer Service Number for instant help.
ReplyDeleteWOW!
ReplyDeleteI love this post. web developmentThe information sites list in this article is useful for me. it is a very important post.
WOW !!
ReplyDeleteI love this post.digital marketing
The information in this article is useful for me. After reading this article, I think I have some ideas for myself.
Thanks for sharing
Hello
ReplyDeleteThanks for providing a great informatic and looking beautiful blog,ranking factors
really nice required information & the things I never imagined and I would request, wright more blog and blog post like that for us.
Thanks for sharing!
I am a beginner too, seo audit online
ReplyDeleteso these all tips help me a lot thanks for sharing. It’s helpful for this blog. Also great with valuable information post. thank you
Nice Article, Thanks For Sharing This Informative Article
ReplyDeletesoftware company
ReplyDeletebrisk logic Ux/UI design, Web and Mobile development, Quality Assurance, Service Integration, Maintenance, AI/ML Solutions, IoT Solutions, IT Consulting, and other services to ensure a strong online presence for enterprises, boost sales, improve visibility and grow customer base
Totally loved your article. Looking forward to see more more from you. Meanwhile feel free to surf through my website while i give your blog a read.
ReplyDeleteshearling leather jacket
biker leather jacket
motorbike leather jacket
harley davidson leather jacket
motogp leather suits
celebrity leather jacket
distressed leather jacket
motorcycle jackets
Leather Trench Coat
bomber leather jacket
I think digitizing embroidery would be much better with some cool threads colorful. What do you think???
ReplyDelete